coffee-20139_1920

Cold-Brew Coffee – Part 1

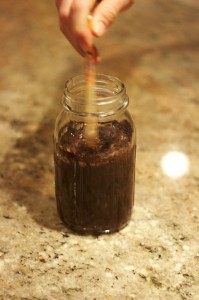
An example of Cold-Brew Coffee preparation.

An example of Cold-Brew Coffee preparation.

I am not a big coffee drinker. Working in an office, some people’s days seem to revolve around coffee. I’m not sure whether it’s that they like the taste, or the social aspect of getting coffee, or whether it’s because they’re all just caffeine junkies and cannot survive without it.

I don’t really understand the attraction though. I don’t like hot drinks, and coffee to me tastes like bitter water, to which I have to add milk to cool it down, and sweeteners to kill the bitter taste. By that stage what’s the point? It becomes sweet flavoured milk.

Then I came across a couple of articles on Cold-Brew Coffee. The concept is simple; instead of brewing coffee in scalding hot water, you brew it in cold water. The caveat being that it takes 12 hours, so this is not a quick morning pick-me-up.

The reasons for cold-brewing sounded good to me. The end product is less bitter, since the slower cold-brew process allows more complex flavours to be extracted from the grounds, and unlike using hot water, it does not release a lot of the acids which give hot coffee its bitter taste. If done right, it does away with the need for any sweeteners, so you get the full flavour of the coffee itself.

This sounded like a fun experiment, so I added a bag of decent quality plunger coffee grounds and some coffee filters to my weekly shopping list.

Now following the instructions, it calls for 1 cup of coffee grounds (yes, a cup) to around a litre of water. As I created this mixture I realised that what you end up with is a concentrate, so not something you’re going to drink straight. In the interests of avoiding a lethal caffeine overdose I did buy decaf. It still smelt like the real thing however.

First note for next time: Measure out the coffee first, then add the water.

Clearly I am such a coffee novice that I didn’t realise it can float on water. At least I was adding it a tablespoon at a time and didn’t try dumping the whole cup on top of the water. The resulting mess would have been much worse. Plenty of stirring was required to mix it all in, and the end result resembled some sort of chocolate syrup.

The mixture is now covered, and sitting in the fridge for the night to brew. Tomorrow morning I will attempt to filter and bottle it, and then the all important taste test. This could still all end in tears.

Stay tuned for an update…
coffee-293220_1920

Cold-Brew Coffee – Part 2

Slow-Brew Coffee might be a better name for it! This is certainly not a way to get a quick morning coffee fix. Thank goodness I can function without coffee in the mornings otherwise I may not have had the coordination needed to finish off my cold-brew coffee experiment.

My coffee mixture sat brewing for 13 hours overnight, although I did check on it a couple of times before I went to sleep. I learned a couple of lessons from the preparation and brewing and extraction process however:

  • Don’t max-out your brewing container – I made a litre in this case, and the process was a little messy with a full container, next time I’ll try 750mL. The good thing about cold-brew coffee is that it has a shelf life of more than a hour or two, unlike regular coffee which degrades as it cools.
  • It may overflow in the fridge – After checking on the brew after 2 hours I found that somehow the coffee was leaking out of the container. I don’t know whether the mixture expanded in the fridge, or the gladwrap I used to cover it set up some sort of suction, but coffee leaked out and pooled under the container. Another reason not to max-out the container.
  • Brewing in a coffee plunger was a good idea – Using a plunger as my brewing container meant I could double-filter the brew when I extracted it, once with the plunger, then again through a coffee filter paper and funnel into a bottle.
  • Using filter papers was a good idea – The plunger alone definitely wasn’t enough to filter the grounds but the filter did an excellent job (which is kind of its purpose). The resulting coffee had no sediments which I could see.
  • Filtering coffee is a slow process – It took a little over an hour to filter the litre of mixture. My funnel and filter set-up worked well, but I can see why some people would use a special apparatus for this. I went through three filters over the course of the hour.

Once all the filtering was done, I had around 800-900mL of coffee in a bottle, and plunger with a cup of wet coffee grounds in it. With the some sort of vacuum or pressurised set-up you could no doubt extract more out of the grounds as there definitely seemed to be more flavour potential locked up in there.

Finally, the all important taste-test. The coffee mixture I ended up with wasn’t overly concentrated, so it was OK to drink undiluted. The result; still a little too bitter for my tastes, however this was fixed by the addition of a little agave sweetener. It seemed much smoother than regular coffee, and was much easier to drink, even without milk which is something I usually cannot manage. The flavours were not as strong as I hoped, so I think my process needs a bit of refining. Next time I will try brewing a smaller batch, but make it more concentrated, and see if that strengthens the flavour. I’ll also need to investigate how variations in brew time and temperature affect the taste.

There’s also the option of making cold-brew coffee using vodka or whisky instead of water for an extra kick. But that might be an experiment for another day.